
English Paper Piecing, It's Not A Sprint, It's A Marathon!
- Brianna Roberts
- Dec 20, 2021
- 6 min read

This month I am blogging about English paper piecing. This is a new hobby for me. I never tried it before this year. I was challenged for my Island Batik December project to make something that was at least 12"x12" using English paper piecing techniques.


Before this year, I didn't even know about English paper piecing. When I found out it utilized hand sewing primarily, I thought that I was in trouble, Big Trouble! I don't really hand sew unless I absolutely have to and I make it as minimal as possible. I realized that I would need to start earlier than December to make this project because I am quite slow at hand sewing and I didn't know the techniques I needed to accomplish an English paper pieced project. I also learned so much along the way and why a project like this can be very useful when your sewing machine is not available.
Pros:
It is portable.
It can be small or large.
Everything you need can fit into a small tin or box.
Scraps can be utilized.
Few tools are needed and it is low tech.
Hand sewing
Peaceful and calming.
Perfect for fussy cutting.
Detailed designs can be accomplished.
Cons:
Traditionally done by hand but you can use a sewing machine.
Patience is needed.
It can be tedious.
It is a long process or takes a long time.
How to get started? Well that is a good question, especially since I have never done it and did not know where to start. So, I researched a bit and here is what I found. This technique uses paper pieces to stabilize the fabric while hand sewing it. Traditionally, hexagons were first used. The earliest known quilt was made in the United Kingdom in the 1700's. In the United States, the earliest known quilt was made in the 1800's. A small piece of paper is wrapped with a piece of fabric that is 1/4" larger than the paper on all sides. It is glue or thread basted then two pieces are sewn together using a whipstitch or oversewing. When the pieces fit together perfectly, they are called tessellating shapes.
Supplies Needed:
Thread: (I used 50wt Aurifil thread but I read that 80wt works great because it is finer and does not show as much at the seam).
Paper pieces: (I bought several shapes from Paper Pieces.). They have a variety of shapes. They also provided a starter kit and an Adornments holiday ornament kit.
Needles: I used appliqué needles but needles specific to paper piecing work better. I received #9 needles from Paper Pieces and they work great.
Glue: I used a Sewline glue pen. I decided to glue baste but you can thread baste as well.
Sewing Magnets or Clips: I used SewTites. They provided the Lite Bars.
Quilting Cottons: Scraps can be used. Island Batik foundations, Sea Glass, Vincent's Garden and Painted Blossoms were used in this project.
Thread Snips or Small Scissors
Small Cutting Mat: I used an Olfa 5 1/2" x 7 1/2" mat.
Small Rotary Cutter: I used a 28mm Olfa rotary cutter.
Small Ruler: 6"in length
Optional: Cutting Templates can be used that have included a 1/4" seam allowance larger than the paper piece.
Optional: Needle threader
Optional: Thimble or finger pads to project fingers.
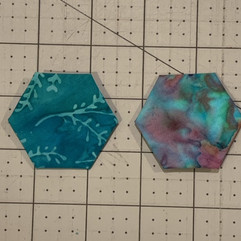
First, choose a paper piece and a piece of fabric at least a 1/4" or more larger than the paper piece on all sides. As you can see below there are so many shapes to choose from. This is part of the fun. Then place the shape on top of the wrong side of the fabric (A cutting template can be used as well. Shown in the top third picture from the left.). I am using Island Batik fabrics so there isn't a wrong side. Now trim the fabric a 1/4" out from each side. Finally add glue to the paper on each edge and fold over the fabric onto it. Hand press it. A covered fabric paper piece has been formed. Repeat with more pieces.


Take two pieces and match with right sides together and place them together meeting along the edges. Hold the pieces together with clips or SewTites magnets. I like both but the SewTites magnets originals and Lite Bars worked best for me because they held the fabric together without getting in the way of my hands and I could put them in the center of my piece rather than the edges. The Lite Bar magnets have a lower strength so they are easier to slide off, particularly if you have arthritis or health issues that make grabbing difficult. Thread your needle (I started out with an appliqué needle but then used a milliner's gold eye #3/9 needle from Paper Pieces). It worked much better. Start to whipstitch from edge to edge. When stitching , be sure to sew through both pieces of fabric along the edge. It is important to keep the paper pieces in while sewing because it provides stability. An example of a sewn unit front and back are demonstrated below. Remember to tie a knot at each end. Repeat with the next joining piece.


At first, I found English paper piecing to be challenging. Now, I have realized that I enjoy it because I can sew while in the car, on a plane, boat or when I do not have the opportunity to use my sewing machine. I can work on it a little at a time and go back to it when I want. Using the tools listed above helped tremendously. I learned to be patient and enjoy the process. At times my hands became sore so I put the project down and started again the next day. I would listen to television while sewing too.
You can design as you go or design before you start. You can also purchase designs. Here I was playing with the shapes to decide on the pattern.


Helpful tips:
Use coordinating thread. At first your stitches may show through the front and practice helps to reduce seeing visible stitches. Whipstitching at an angle helps hide the stitches as well.
Put together a box where all your supplies can be kept
Do a little at a time. It's a marathon, not a sprint.
Buy a starter kit. Paper Pieces has a neat little beginner's kit for only $32.00. It makes a great gift and best yet, Paper Pieces has thought of everything! The kit seen below was provided by Paper Pieces

Get a needle threader. It helps to preload needles so that the process can go a little bit faster.
Start with one basic shape. I made the mistake of using 4 shapes and probably should have started with just one shape. I was a bit ambitious.
Use something to hold the pieces together. I like SewTites. They really do the job of holding the pieces together easily and are perfect for small or large projects. They come in a lot of different shapes and sizes.

Have fun fussy cutting. I enjoyed making the different shapes and prepping them to be sewn.
For my final project, I decided to make an organizer to hold my English paper piecing projects in. The piecing measures 12.5" x 16". It has 84 paper pieces hand sewn together. I designed the organizer to fold over like a book. It measures 13.5"x 19". It has a magnetic closure, two zipper pockets, a needles pocket, elastic pen and scissor holder, two large pockets, and three smaller pockets. I quilted the outside of the organizer using my BERNINA 570 QE, Schmetz topstitch 90/14 needles and Aurifil 50wt thread. I made a video to demonstrate how to cut and sew these pieces together. Having the right tools helps a lot when you are a beginner. This project has really made me appreciate hand sewing. At first, I was not thrilled about the prospect of it and then I gave it a try and really liked it.


Video:
Thank you to Island Batik, Paper Pieces, Schmetz Needles, SewTites and Aurifil Thread for sponsoring this blog and providing these wonderful supplies for my project. I learned a lot.


Check out my fellow ambassador's projects for December. They've made some pretty cool stuff.
Megan Best ~ Bestquilter
Pamela Boatright ~ Pamelaquilts
Elizabeth DeCroos ~ Epida Studio
Jennifer Eubank ~ Archipelago Quilting
Jennifer Fulton ~ The Inquiring Quilter
Preeti Harris ~ Sew Preeti Quilts
Joanne Hart ~ Unicorn Harts
Mania Hatziioannidi ~ Mania for quilts
Emily Leachman ~ The Darling Dogwood
Denise Looney ~ For The Love Of Geese
Leah Malasky ~ Quilted Delights
Sally Manke ~ Sally Manke, Fiber Artist
Maryellen McAuliffe ~ Mary Mack Made Mine
Claudia Porter ~ Create with Claudia
Gail Renna ~ Quilt Haven Threads
Brianna Roberts ~ Sew Cute And Quirky
Michelle Roberts ~ Creative Blonde
Gail Sheppard ~ Quilting Gail
Andi Stanfield ~ True Blue Quilts
Jennifer Thomas ~ CurliCue Creations
Janet Yamamoto ~ Whispers of Yore
It looks great, Brianna! I love that you made it into a bag. Super cute. I hope you do more EPP projects in the future.