


Large Scale Paper Piecing And Paper Piecing Tips
- Brianna Roberts
- Oct 14, 2021
- 3 min read

Have you tried foundation paper piecing before? Well if not, give it a try. I enjoy paper piecing for several reasons.
Pros:
It is precise and accurate.
It allows for intricate designs to be made without using appliqué methods.
It can be used in a wide variety of sizes from very small to very large.
It makes piecing triangles very easy.
Intricate designs can be formed.
Very small pieces can be sewn.
Sewing on paper allows for the fabric to be stable and reduces stretching from handling the fabric.
Cons:
Wastes fabric
Time consuming
Most blocks have more than one paper foundation.
Paper piecing uses paper to piece together units or sections of a design for a quilt, home decor or bags. The fabric is sewn on the back of the paper and the section or image formed on the back is a mirror image of the paper being used for piecing.
When paper piecing, the stitch length is shortened to about 1.5 mm so that the paper gets perforated and can be taken off of the back of the sewn fabric pieces easier. When paper piecing, the fabric pieces need to be large enough to cover and overlap areas of the paper. This ensures that it will cover the pattern piece.
Cutout and layout your pattern pieces.


Sewing Sections Together To Form A Unit:
Each pattern piece is identified with numbers for the order of piecing the fabric. Use these numbers to sew the fabric sequential order.
Select fabric that will cover each section which is identified by the seam lines on the paper. Be sure that the fabric overlaps and is enough to cover the seam lines by an additional 1/4" except for the edges. This pattern included the 1/4" along the edges of each section.
Place the fabric underneath the paper. The wrong side is facing up and away from the back side of the paper. Put the fabric edge over the seam line 1/4". I am using batik fabric so there isn't an identifiable wrong side.
Take the second piece of fabric and lay it right sides together along the edge of the other fabric. Be sure to cut this piece of fabric to match in size to its respective paper section or unit. It needs to be big enough to cover the unit so that it can be trimmed later.
Pin in place. Turn over the paper. Set your machine stitch length to 1.5mm or less than the standard stitch length. Sew the sections together.
Fold over the second piece of fabric and press it. Press it with the paper on.
Trim the edges of the unit along the edges. If the seam allowance is not included in your pattern, include it. This pattern includes the seam allowance along the edges.


Continuing To Sew Sections Together To Form A Unit:
This unit has three sections. Retrieve the third piece of fabric for this unit. Place under the paper to check the size again. Remove the fabric and put aside.
Place a ruler over the seam line between sections two and three. Fold up the paper along the seam line. Trim a 1/4" seam allowance from the folded edge of the paper.
When lifting the paper, you can see the previously sewn sections.


Once the seam allowance is trimmed, now the third piece of fabric can be sewn. Repeat the process from above to add the third piece of fabric.
Sewing Units Together:
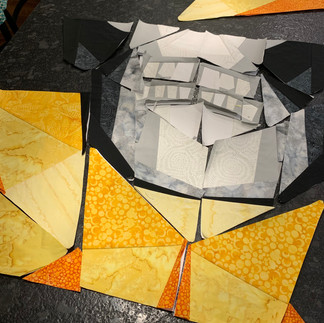
Lay out the project so that it can be visualized before sewing it together.


Much like traditional piecing, the units are sewn together by matching seam lines. A 1/4" seam allowance is used and the paper still remains on the back of the fabric.
Sew on the paper side using the seam allowance lines.
Continue to piece together until the quilt top has been completed.
Now the paper can be torn off the back. Be careful not to rip the seams.


These guidelines can be used for small or large paper piecing projects. This was a large scale project for a sew along #fracturedskullsal and the pattern is by https://andsewi.com .
All the fabric was provided by Island Batik.
Give paper piecing a try, it is fun.
Comentarios